
When to Use This Plugin
This plugin serves the following use cases. If you only need to list a handful of people on a single, static page on your site, consider building a layout with blocks and patterns instead. If you’re not sure if the plugin will fit your use case, please reach out to our CALS Web Services team and we’ll let you know if we think this plugin is a good fit for you, or we can advise on other options.
- Create individual profile pages for faculty, staff, students, or other types of people for your group.
- Display a directory of people across multiple pages on your site.
- Organize people into groups and allow visitors to filter/search by category, etc.
Plugin Features
Profile Pages
Create profile pages for each person using the block editor. Each profile has a few standardized fields, such as name, email, and bio, but you also have the flexibility to add whatever custom content you’d like using the block editor.
Organizing People
Before creating your first person, you should come up with a system for organizing them to keep filters clean, logical, and consistent. There’s a few taxonomies available in the plugin that can be enabled, disabled, and re-labeled in the plugin settings. In most cases, you do not want all taxonomies enabled as it can make filtering and displaying people on your site cumbersome.
- People Types: Typically used for grouping people by position type (i.e. Staff, Faculty, Student, Emeriti, etc.) but can also be used for generic categorization.
- Units: Define your organizational unit structure. This could be used for offices or teams within your group.
- Departments
- Areas of Expertise
- Units Served: Indicate which groups each person works for. For example, an HR staff member may be responsible for select departments.
Learn more about adding, editing, and removing terms from each taxonomy here. In this example, the Post Categories taxonomy is used, but the features are generally consistent with each of the taxonomies above.
Add a new person
- Navigate to your admin dashboard
- Select People > Add New Person
- You should see a pop-up appear with profile fields. If you do not see this pop-up or you accidentally close it, open it from the settings panel by clicking “Edit Person Info”
- If your site is set up with external data sources, you will see them in the left of the window. Choose a source or leave it as manual.
- Add a person’s details by filling out the form fields. Depending on your site settings, there may be a few required fields you must complete before you are able to publish. Otherwise, most fields are optional and won’t be displayed unless it is filled out. It is highly recommended that every profile has a headshot photo with alt text.
* Always use fields for their designated purpose. For example, do not use the pronouns field to display a person’s department or website. While it might look fine on the individual profile, it will create confusing or broken layouts on other pages where the data is pulled in using the People Directory or List block.
** Think beyond the profile page: Check for a dedicated field before adding info directly into the block editor. Information typed into standard blocks (e.g. the Paragraph block) stays only on that profile page. Information entered into a field (like the Address field) is “portable”—it can be used across your site. - Categorize the person according to your site’s taxonomy structure. For example, you may assign a person’s people type as Staff or Faculty.
* Not all sites use all taxonomies. You can enable/disable taxonomies in the plugin settings. If you have not set up a taxonomy structure for the site, you should do so before adding people to keep the filters as clean and logical as possible. - Choose a profile layout, or start from scratch. Depending on your site settings, you may have different options to choose from, or one may automatically be set up by your administrator. By default, you can choose between two patterns: Basic and Featured. Hover over each available pattern for a preview.
- Customize the layout, if necessary. Each profile field you filled out corresponds to a block in the editor, and they can be customized, styled, and moved around as desired. If the block is added to the page but the field doesn’t have any content, it will not be rendered on the page. Many people use the tabs block to create additional profile sections, such as publications, awards, etc.
- Publish the profile and preview it on the front-end to make sure everything looks right.
List People
People can be displayed on your site using the People Directory or People List blocks. Both blocks offer advanced filters, allowing you to automatically or manually select exactly who is displayed.
| People Directory | People List | |
|---|---|---|
| Display a list of people from the plugin and (optionally) link to each person’s profile | ✓ | ✓ |
| Sort by first name, last name, or default (menu order) | ✓ | ✓ |
| Filter by assigned taxonomy terms | ✓ | ✓ |
| Select individual people to display | ✓ | ✓ |
| Full control over layout and design using the block editor | ✓ | |
| Allow visitors to easily search, sort, and/or filter the people displayed | ✓ |
People Directory Block*
The people directory block allows you to list people on your site dynamically, allowing visitors to search, sort, and/or filter right on the page. Each profile has a fixed layout with some customization options, but it is more limited compared to the customizability of the People List block.
*Note: The people directory block requires a separate plugin to be activated. If you can’t find it, please contact us to activate the plugin.
People List Block
The people list block allows you to display a list of people on your page. It can automatically update who is displayed based on pre-defined filters in the editor (e.g. all people with the “Staff” people type), but does not allow users on the front-end to search and filter. However, it allows you to completely customize the post template for each profile using the block editor since it is built on top of the core WordPress Query Loop block.
To use the block, add it to your page. You’ll have the option to choose a starter pattern or start blank (you should start with a pattern).
- Customizing the layout
Once you’ve selected a starting point, you’ll be able to edit the “post template” by adding, removing, or customizing blocks inside of it. For people, you’ll want to use the blocks within the “CALS People” category to display profile information (such as name, email, phone, social media, etc.). - Configuring who is displayed
You can also configure the sort, filters, and/or specific people you want to display by selecting the outer “People List” block in the editor. To better understand the anatomy of the block, review the documentation for the Query Loop block here.
Custom Ordering (advanced)
Each person has a hidden “order” property that dictates where they show up in the default sort when listing them on your site. By default, order is set to 0 (zero). The default sort takes the people with the lowest order value and displays them first (in cases of a tie between order values, they will be sorted alphabetically by last name). Therefore, anyone you want to show up first, such as leaders in your organization, should have a negative order value.
You can set the order value in two ways:
- Quick Edit
Find the person in the table in “All People” and choose “Quick Edit.” You’ll see a field for “Order.” - Block Editor
To change the order value in the block editor, open the settings sidebar and make sure the “Person” tab is selected. At the top, next to the title, you’ll see a menu with 3 vertical dots. Click it and choose “Order” from the dropdown.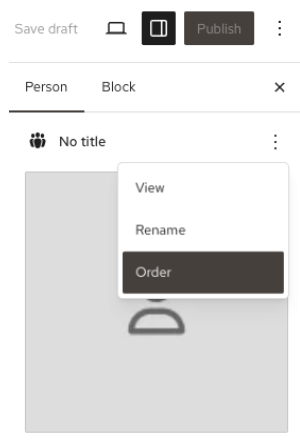
If you’d like to use this functionality, we recommend coming up with a system. On CALS Admin, we use the following system:
- -100: Dean
- -80: Associate Deans
- -60: Assistant Deans / Directors
- -40: Associate Directors
- -20: Other Leadership
- 0: Everyone else (leave as default)
External Data Sources
Source person profile data, such as name, email, phone number, and office location from UW campus sources, another site using this plugin, and other sources. These connectors offer a single source-of-truth rather than trying to maintain profile data and people lists in many different places.
Further, you can import managed people lists from most of these sources, allowing you to use an external source to import and synchronize lists of people. For example, you could import all Biochemistry faculty from Faculty Success. If a faculty member leaves and is removed from Faculty Success, they would be removed from your site. Conversely, new Biochemistry faculty would automatically be added to your site.
- UW People
Source basic profile data from UW campus sources. This source can be used for individual profiles, but does not support person lists.- Name
- Phone
- Address
- Position
- People Type(s): Academic Staff, Faculty, Limited, etc.
- Department(s)
- Unit(s)
- Faculty Success
Requires a separate plugin. Allows you to source profile data and faculty lists from Faculty Success. Can filter by department.- Name
- Phone
- Address
- Website
- Position: Full Professor, Assistant Professor, Associate Professor
- Photo
- Departments
- People Types: Faculty + any of Full Professor, Assistant Professor, Associate Professor, Tenured, Tenure-Track, Non-Tenured
- Other WordPress Sites
Sync all profile data and content with other WordPress sites using this plugin. Can also sync person lists, allowing you to filter by whatever taxonomies are enabled on the source.
Migrating From Old Directory Plugin
The CALS People Plugin is the successor to our legacy “Directory” plugin, and we’ve designed a migration path to make upgrading as painless as possible. However, you will need to make some decisions about old fields during the migration, since not all fields will carry over.
Before Migration
Review and clean up the people listed on your site. If you have any unpublished profiles (e.g. drafts) they will not be brought over. Also, if you are not using fields for their intended purpose (i.e. using the “pronouns” field to display your website), there will be side effects during the migration. This is a poor practice that you must discontinue, ideally before you migrate.
The following fields will not carry over:
- Name Prefix (e.g. “Dr.”) — omit or prepend to the person’s first name
- Name Suffix (e.g. “Ph.D.”) — omit or append to the person’s last name
- Appointment — omit, display using blocks on the page, or use taxonomies to assign appointments
- Office Schedule — omit or add to page content
- Additional Fields — add to page content
Run Migration (contact us)
When you are ready to migrate, please contact us. We will activate the new plugin and run the migration process. The process will import all of your people from the old plugin into the new one and set their status as draft. Running the migration process will not remove old profiles from your site. They will remain in the “Directory” plugin and published on your site until they are deleted at the end of the migration process.
Review Migration
Once we’ve run the migration, we’ll may reach out and give you the opportunity to clean up the profiles (depending on your site). If we do not ask you to review the profiles on your site, you can ignore this step. We may ask you to let us know how we should handle any non-migratable fields, such as prefixes and suffixes.
You can see which profiles need attention by navigating to People > Settings > Migrate. Only site administrators can access the settings page. From there, you’ll see a “View Results” toggle. Results will be deleted automatically after 1 week. The profiles that “need attention” will have the old data that could not be mapped at the top of the page. You are in charge of finding a home for that information on the page, or removing it.
Once you are done reviewing a profile, it’s a good idea to indicate that. You may choose to change the status to pending or schedule a publish date (or publish immediately–just be aware that during the migration, each profile will exist on your site twice if you publish profiles immediately). It is recommended that you go through all profiles, not just those that “need attention” to ensure the data transferred over as intended.
Final Steps
Once all profiles have been reviewed, contact us. We’ll assist in publishing the new profiles, deleting the old ones, and replacing all instances of the old people directory block on your pages.
Tip: type “wp:acf/directory-content” into the site search to quickly find pages using the old block.
New profiles will be accessible on your site at “example.wisc.edu/people/first-last” by default. To avoid 404 errors if these profiles have been linked to from anywhere, you may want to change the URL slug to directory to match the old plugin within the “People > Settings” page.