
Menu Locations
Primary Menu
The primary menu is the main menu on your site. This is the main menu bar that appears to the right of your logo (or underneath, depending on your screen size and the number of menu items). You’ll add most of your links to this menu.
Resources Menu
The resources menu is the skinny red bar that appears at the very top of the header. You’ll find the search and dark mode toggle here. This menu is intended to only have 1-3 top level items to preserve the layout for as many screen sizes as possible. You’ll most likely add menu links here that are visited infrequently or that link to an external website.
Do not nest resource menu items more than 1 level deep. The resources menu only supports a single submenu and any items added further than 1 level deep will not display.
Best Practices
Do
- Organize a large menu into a hierarchy. For example, you might list “About” as a top level, and then “People” underneath as a secondary menu item.
- Add frequently visited pages to your primary menu.
- Try resizing your window when you make changes to the number of menu items in either location. Make sure no unintended wrapping occurs on smaller screens.
Don’t
- Make long menu titles. Keep them 3 words or less.
- Add more than 8 top level menu items. Having too many top level pages makes your site hard to navigate.
- Nest menu items more than 3 levels deep. Any menu items more than 4 levels deep will not show on your site.
- Add frequently visited pages to your resources menu.
Adding/Removing Pages From Your Site Menu
To edit your menu, you’ll choose Appearance > Menus from your admin sidebar. From there, you can choose a menu to edit, or create a new one. This page can be a little bit confusing. It’s important to understand that you can create unlimited menus, but there are only a limited number of locations you can put each menu. You may need to create a new menu in order to assign it to a location that does not already have a menu. Once you have the correct menu selected, the editing experience is fairly straightforward.
WordPress has a great article about how you can edit your menus, create hierarchies, and more.
Creating a Full Page Header
A common site layout, especially for home pages, involves shifting the top image block “behind” the menu. For example, the hero section on the CALS home page has a large video at the top that blends in nicely with the header.

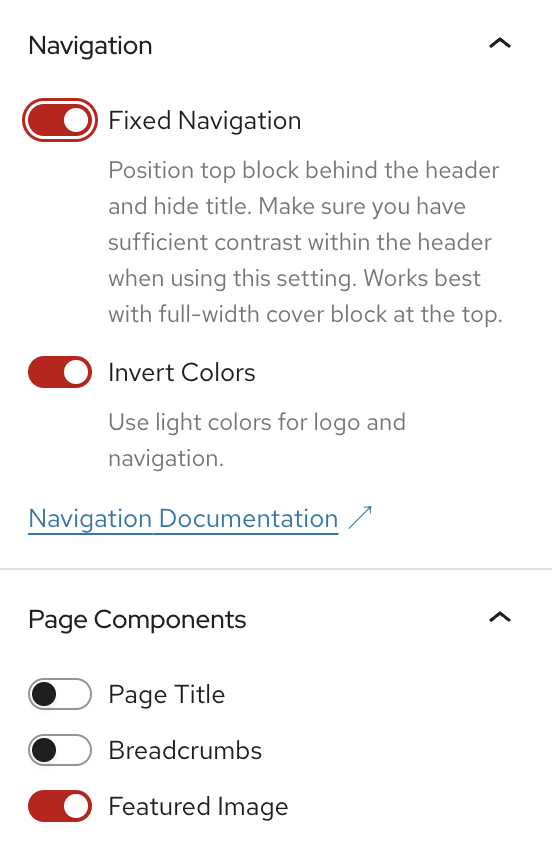
To achieve that effect, we have to enable a few settings on your page. First, go to the page you would like to edit. Make sure that the top block is a full width image or cover block. Find and enable the following settings in the right panel.
- Navigation > Fixed Navigation – shift the top block up to the very top of the page
- Navigation > Invert Colors – change the text colors of the navigation to white instead of black, assuming you are using a dark image
- Page Components > Title (disable) – hide the page title from showing on the page
- Page Components > Breadcrumbs (disable) – hide the page title from showing on the page
You should also consider adding a dark overlay to your cover block to ensure the navigation items are readable. Please note that you’ll need to repeat this for any pages you would like to appear with the menu overlaying the top bar. We have it set up this way so site admins can ensure there is an image as the top block and the menu appears as intended on each page.
Need help with your website?
The CALS Web Service team is here to ensure you have all the tools you need and understand how to use them. If you ever get stuck, please don’t hesitate to reach out. We’re here to help!